Showing posts with label how-to. Show all posts

Saturday, June 18, 2011

How to | using pinwheel flowers

You be forgiven if you thought the latest kit from Storyboard Kits was just for scrapping boys.  It has a wonderful arrangement of boyish products that are perfect for the men in your lives. :)  But I thought I'd challenge myself and create a layout featuring my daughter and flowers!!!


It was simple enough to take the Basic Grey pinwheels and add a stitched stem to the layout.

To add the stem, mark in pencil the length you require and then pre-pierce the paper with a needle or paper piercer.  (I use the splinter remover from our first aid kit!!)  Pierce the paper by eyeballing the stitch lengths.  Alternatively, you can measure the exact stitch lengths you would like by using a ruler.  Back stitch using embroidery thread and a colour that matches your layout.


The Bo Bunny wraps were also used as rolled flowers and as touch of bling to the top corner.  The colours I've chosen have an outdoorsy feel but were softened using "vanilla" ink and distressing around the edges of the main patterned paper.


And there you have it.  A "girly" layout....x

Sunday, June 5, 2011

Kelsey Technique | Painted Backgrounds

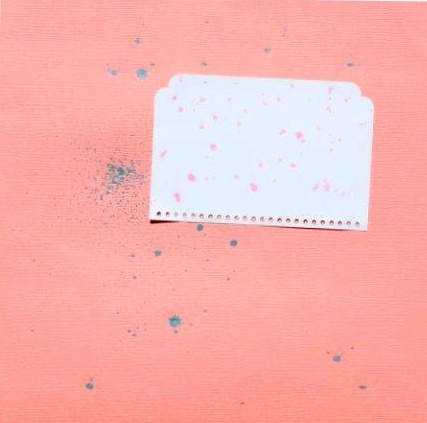
Using paint of my backgrounds is my favourite technique at the moment. It's a great way to add some depth to your page and draw the eye in to the main elements.


I start by positioning my photos on the page and visualising how I want to layout to "flow", thinking about where I will be placing papers etc.


I then dip the end of an old card (in my case a spotlight card!) into my blob of paint, using a smaller amount for lighter strokes, or a larger amount of paint for heavy, thick strokes.


I find I have more control using a smaller amount, I can then go over at again if I want it thicker. You can also create small "splats" by using light strokes when most of the paint has been applied and the card is nearly dry.
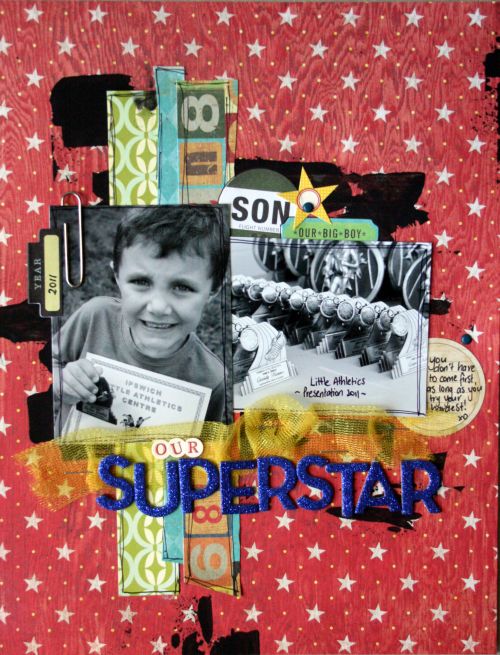

Once the paint has dried you can can then finish your page off with papers and embellishments. I find using less actually compliments the effect of the paint!


Crystal

xo

Tuesday, May 31, 2011

Technique / Journaling by Wendy Smith

Some people like to and some people don’t. Some people do it lots, and others barely at all.

It is an individual thing really, but journaling is one of those integral parts of every layout i do. So i decided that i would show you 4 different journaling styles you can use on your layouts, and maybe try something different if you want to

INTERVIEW STYLE

Write a few simple questions down and interview your subject. This is great to do with children, because they come up with some really unique answers and insights. You might just find out something you didn’t know about your subject that is worth documenting

017

STORY TELLING

Somethings warrant a story. My layout “MR MONKEY” was about a character that Charlie made up, and it really needed explaining and a story. So if you have a picture that has a great tale behind it…share it! Not just the usually who/what/when/where but the why of a story can really make your journaling worth the read.

022

JUST THE FACTS

Some layouts only need the fact..the picture tells the story. These are the layouts where there is so much going on in the picture that you only need the who/what/when/where and you can actually omit the why! In my layout ‘FAVORITE THINGS” the picture tells everything you need to know…the kids are in a lolly shop for goodness sake!

024

JOURNALING AS A DESIGN FEATURE

Try using your journaling as a design feature on your layout, by creating borders, or shapes with your words. In the layout “Crazy Kid”, I have used my journaling as a border around the kraft cardstock, and almost used like I would normally use doodling. Just something a little different to look at and read.

020

So don’t fear journaling, embrace it. It not only makes the memories last forever but it also personalizes your page.

Monday, May 23, 2011

Jarvis / Technique by Wendy Smith


In the Jarvis Kit last month, we all received a section of dress pattern tissue paper, I I always like to use it in different ways on my layout. I saw Lisa used it as a ruffle on one of hers, and Kim incorporated it in her Lollipop flower. I used mine to create several layered scrunched flowers.

In this layout, I have layered the dress pattern flower amongst other embellishments on my page.

photos

Here is how to make the flower.

1- Assemble your circle punches and folded dress pattern

1

2- Slide your folded paper through and punch out several layers of tissue paper

2a2b

3- Repeat process with the smaller sized punch

4- layer your smaller circles on top of the later circles, and sew on a button to connect them all

4 5a

5- scrunch the layers of dress pattern paper, and spread out as needed. There you have a unique flower for your layout!

6 7a

I used them on several of my Jarvis layouts and left them plain, but for this layout I inked it with some Tim Holts Distress Ink. Glimmermist works well too!

CU photos

Friday, May 13, 2011

How to | create a grungy banner

Banners have been in trend for quite some time. And why not! They are fabulous and fun elements on a layout and very easy to create.

Here's how I created a grungy look banner for a boy page.


Materials needed: red twill ribbon, Fancy Pants patterned paper, ink, staples, foam squares.


step 1.
Cut the patterned paper to the size you require. I have simply cut out the gingham/Love, Live, Laugh strip and trimmed it into 1" segments.

step 2.
Cut the 1" segments into the triangle shape, as shown above.

step 3.
Scrunch, fold and generally rough up the triangular patterned paper shape.

step 4.
Ink the edges generously with a co-ordinating colour. I have used Versacolor pinecone.

step 5.
Place a foam square on each of the reverse sides of the distressed banner pieces.

step 6.
Fold the twill ribbon in half along its length and place the top of the triangular banner shape inside. Staple the ribbon to the paper. Continue until you have your desired banner length.

step 7.
Add the banner to your layout using the foam squares.

The red, black and cream colour combo of this layout reinforces the grunge look. I especially love the graffiti type writing found on the same piece of patterned paper as the banner strip.

Please leave a comment here if you follow this step by step. I'd love to see your handy work! :D Thanks, Leanne.

Friday, April 8, 2011

How-to | Create a layout with an uneven background

Kim Arnold shares with us, some tips for creating a layout that moves outside the 12x12 box!
Kim says...

Originally I was just going to put the diecut paper onto the spotted background – leaving the background 12x12. When I was fiddling around it was sitting on my desk with the diecut hanging of the side and I thought it looked great that way and so that was how I was going to do the page.

My tips for making sure that your page still ends up 12x12 so that you can get it in a page protector are:
  1. Stick your die cut on where you want it
  2. Line a whole sheet of 12x12 paper up over the top of the layout – lining up the edge of the whole sheet with the far edge of the diecut
  3. Mark on the background of the layout where the 12 inch edge is and then trim. I find this the easiest way to make sure that the layout ends up the right size.
  4. I also had my chipboard frame hanging off a little on the right side, so I just trimmed my background down a little further before I stuck the frame on – so the whole layout is still 12x12.
I would love to see you having a go at creating a “non-square” layout using some of the lovely diecut papers that Lisa includes in every kit.

Thanks Kim!  Might have to have a got at this myself!

Kim also shares this layout using the Isla kit.  The butter background has been misted with green to compliment the other touches of green on her layout.  I love the treatment Kim has give the tag and envelope. The envelope has been wrapped in May Arts ribbon and tied with twine. A simple butterfly and button finish it off.
Kim has also created a spiral flower using calico. The spiral was cut using pinking shears to give it a different look. A fabric brad placed in the centre, holds this flower in place.  Additional flowers were created and layed on their side to add even more dimension.
Stay tuned for another post from Leanne Allinson!

Cheers, Lis.

Monday, March 21, 2011

How to | create a layout step by step

Today's "how to" post comes from Wendy Smith.  Wendy has created this super cute Easter layout using the journaling sheets found in this month's kit "Isla".  Follow the steps below to create your own version.
Here's how...
Step1 - Using glimmermist, spritz and flick over base cardstock
Step2 - Repeat glimmermist process using a different colour in the back of one of the journal blocks
Step3 - Layer your journal blocks and chipboard doily to create a unique pattern, and matting for your photos
Step 4 - Slide your photos slightly under the scrapware chipboard doily
Step 5 - Adhere your ribbon and cluster your flowers around the chipboard doily
Step 6 - Cut out the butterflies from the journal blocks, and scatter them on your layout
FINALLY...Cut out a circle shape and place on your doily to journal on, place your title and doodle around the edge with a pen
Such a beautiful and simple layout to replicate.  The colours of "Isla" are just perfect for Easter layouts, and now's the time to catch up on last year's photos before this Easter hops along!

Have fun creating your own version!
Cheers, Lis.

Thursday, February 24, 2011

How-to | create organza flowers and bunting

Today's how-to comes from Wendy...


Here's a great use for the chipboard circles included in the "Hudson" kit! Wendy has used it as the base for an organza flower. Creating an organza flower without any kind of support would be a difficult task. Wendy shows you here how easy it can be!

First up...create an organza flower
Step1 - place a blob of glue in the centre of the chipboard circle
Step 2 - start scrunching and curling the ribbon around in a circle
Step 3 - once you are happy with the look of the ribbon stick the end piece to the base
Step 4 - spray glimmermist in your choice of colour on the flower to compliment your layout
Step 5 - leave to dry
Step 6 - adhere a little rosette brad in the centre for decoration
(you could use a button or a different kind of brad)

Bunting on layouts continues to grow in popularity. Here Wendy shares with you how to create a fun bunting element for your next layout!

Now onto the bunting...
Step 7 - with pinking scissors, cut your paper on an angle to create a triangle shape
Step 8 - ink the edges of each triangle
Step 9 - using 3D tape, adhere to your layout in a curved shape
Step 10- carefully glue on some twine to finish off the banner look and place buttons either end!

Here's the final product!  Wendy has used the bunting across the top of her layout, and created a cluster of elements incorporating the organza flower. Such a sweet layout about Wendy's boys.
Enjoy creating these fun elements for your next scrapbooking project!

Cheers, Lis.